STEP ONE
|

|
Here's my starting area I want to add the cutout to.
|
STEP TWO
|
|
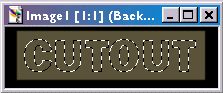
Choose the text tool ( ), Select your font - a nice and heavy one.
Make sure you have 'floating' selected in the text options. I usually use the same colour or one very close to the original.
Place text. ), Select your font - a nice and heavy one.
Make sure you have 'floating' selected in the text options. I usually use the same colour or one very close to the original.
Place text.
Choose '[selections]->[Defloat]'.
|
STEP THREE
|

|
With the selection still active, make a new layer ('[Layers]->[New Raster Layer]->[Ok]').
Choose '[image]->[Effects]->[Cutout]'
In the cutout options - I used:
Opacity: 80
Blur: 3
Vertical: 2
Horizontal: 2
Shadow colour = Black.
|
STEP FOUR
|

|
Add another layer ('[Layers]->[New Raster Layer]->[Ok]'). I like to put the two cutout effects (top and bottom) on different layers, this
allows me to have total control over the transparency of both colours.
Choose '[Image]->[Effects]->[Dropshadow]'
Settings I used:
Color = White.
Opacity: 90
Blur: 0
Vertical: 1
Horizontal: 1
Now select '[Selections]->[Select None]'
Look's a lil rough at the moment.
|
STEP FIVE
|
|
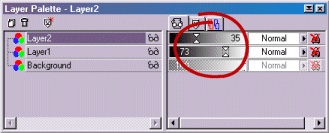
Make sure the layer palette is on . .
Adjust the layer transparency to your liking by moving the horizontal sliders.
|
STEP SIX
|
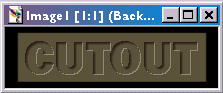
|
Finished Image..
|