STEP ONE
|

|
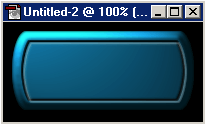
Here's the start of my navbar that I want to use. Right-click and save this image for this tutorial if you like.
|
STEP TWO
|
|
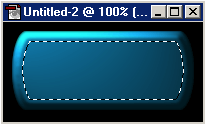
Begin by creating a new layer ( ). Now create the selection (outline) that you wish to use. For my selection, select the wand (or 'W') and
click on the black of the image. Then Select > Inverse then Select > Modify > Contract and I contracted about 10 pixels.
. ). Now create the selection (outline) that you wish to use. For my selection, select the wand (or 'W') and
click on the black of the image. Then Select > Inverse then Select > Modify > Contract and I contracted about 10 pixels.
.
|
STEP THREE
|
|
Now we need the two default 'colors' - black and white. If you dont have these on your foreground and background, press 'D' or click the little
black and white image below the fore/background colors.
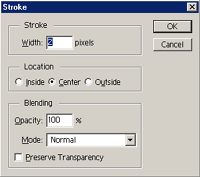
With black as the foreground, choose Edit > Stroke (or hold Ctrl + E then S) and the option box on the left will appear. Select 2 pixels for the width and center for the location. Leave the opacity for the moment.
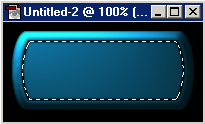
The image below left should be similar to yours. (it's a little hard to see the black outline with the selection active).
|
STEP FOUR
|

|
Create a 'new' layer (), keep the selection active. Press 'x' or the arrows near the fore/background colors to exchange the black for the white.
Now choose Edit > Stroke and again stroke the line with a width of 2 and a center location.
Choose Select > Deselect (or Ctrl + D) to kill the selection. The white line layer should be overlapping the black one now.
|
STEP FIVE
|
|
Make sure the white line layer is the selected layer, and press 'V' or select the move tool on the toolbar.
Move the line by hitting the arrow keys on your keyboard - two pixels down and two pixels right.
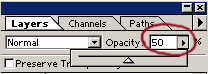
Now we adjust the opacity of the white line layer to look a little better. You can do this by adjusting the opacity level on the layers pallete (image to the left), or pressing a numeric key on your keypad (eg: 5 for 50% opacity).
|
STEP SIX
|
|
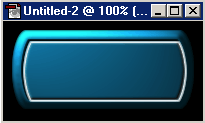
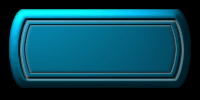
And that's about it! You can of course make smaller lines (or bigger) like the image to the left.
You can use this same method of Stroking, to create the outlines around text or any other objects.
|