STEP ONE
|
|
I'm starting with a blank 200x200 'canvas' with, as usual, a black background :)
|
STEP TWO
|

|
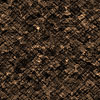
Now select Filter > Texture > Patchwork and make the setting to your liking, I choose:
Square Size = 4
Relief = 8.
|
STEP THREE
|
|
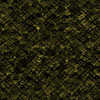
Next select Filter > Brushstrokes > Crosshatch and I used the following settings:
Stroke Length = 9
Sharpness = 6
Strength = 1
|
STEP FOUR
|
|
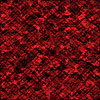
Select Filter > Other > Offset with similar settings as below:
Horizontal = 100
Vertical = 100
(NOTE: Make the horizontal and vertical entries HALF of the height and width of your image - mines 200x200, so Horizontal = 100 and Vertical = 100)
Undefined Areas = Wrap Around (radio button)
This offset filter has now moved what was on the edges of the image into the middle, making the edges seamless. All we have to do now is to get rid of the
slight lines in the middle of the image that has come from the edges.
|
STEP FIVE
|
|
Now with the 'stamp' tool (S on the keyboard or select in the tools palette) put the cursor over an area you wish
to copy, press ALT + Left Click and then left-click and hold in the area you wish to copy to. Cover up the slight lines.
|
STEP SIX
|
|
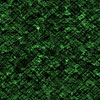
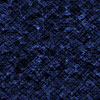
I decided to lighten the image a little:
Image > Adjust > Brightness/Contrast
and I set Contrast only to: +50
|